Intro
Many organisations aim to deploy Private Endpoints across their Azure resources to enhance platform security.
However, they may not fully understand the consequences and challenges associated with this approach. In contrast, using Public Endpoints often means many configurations are handled automatically, which can mask the complexity and make users unaware of the necessary configurations when setting up Private Endpoints.
A crucial aspect of ensuring Private Endpoints function correctly is configuring DNS properly. Proper DNS setup is essential for establishing connectivity. In this blog, I will guide you through various design options for setting up DNS for your Private Endpoints to ensure successful deployment.
Private Endpoint Re-Cap
So before we get into the DNS config jazz, let’s just have a quick re-cap on what a Private Endpoint does and what is.
A private endpoint is a network interface that uses a private IP address from your virtual network. This network interface connects you privately and securely to a service that’s powered by Azure Private Link. By enabling a private endpoint, you’re bringing the service into your virtual network. (Microsoft)
In short, when we deploy a Private Endpoint, we disable public network access, making the service accessible only from within the secure network.
This means you cannot simply connect to the service from the internet.
Instead, you need to be either on your company’s corporate network (assuming they have a VPN into Azure) or using a cloud-native service within the network, such as Azure DevBoxes, Azure Virtual Desktop (AVD), or a Virtual Machine (VM)
Since a Private Endpoint uses a private IP address, its name is no longer resolvable in the public domain. While this is automatically managed for you in the public world, with Private Endpoints, you need to configure the private DNS.
We can manage the name resolution through azure Private DNS, where we can configure Private DNS Zones to enable name resolution because Private DNS Zones manages and resolves domain names in the virtual network without the need to configure a custom DNS solution, and additionally are not resolvable over the internet.
Ok enough waffle, let’s get into it!
DNS Option 1
Here’s the simplest scenario: If all your services are in one VNET (which isn’t really recommended), this is the option for you. I get it; sometimes you’re stuck with this setup and can’t change it.
In this design choice, your Private Endpoint is set up within a Virtual Network, and your private DNS zone (in this case, privatelink.blob.core.windows.net) is also connected to the same Virtual Network. This setup ensures that any device within that Virtual Network can resolve the private endpoint without any issues.
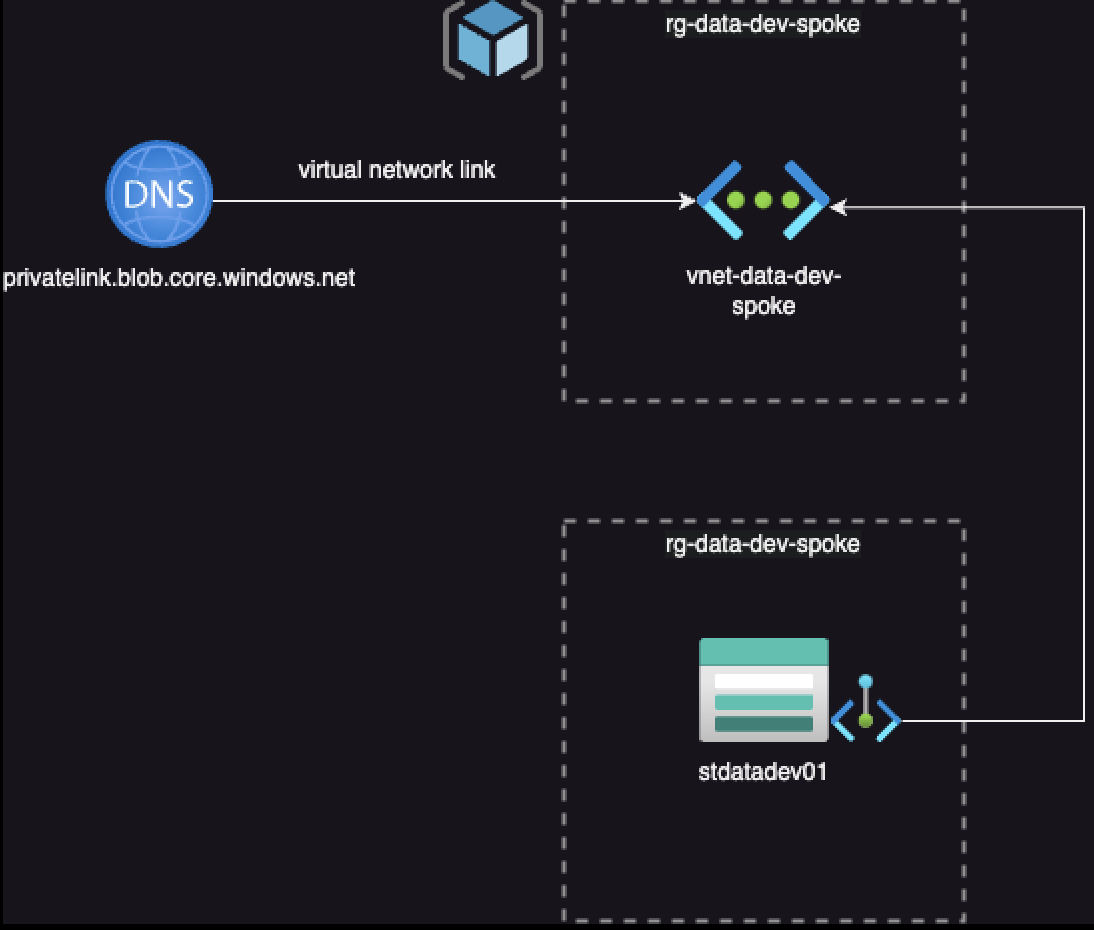
You might be thinking, “Well, that sounds straightforward enough.” However, I’d only recommend this scenario for testing purposes and advise against using it at an enterprise level.
DNS Option 2 Hub – Spoke
The second option involves implementing a hub and spoke architecture in your Azure environment.
In this setup, we observe a typical hub and spoke topology, where a central hub network connects to multiple spoke virtual networks through VNET Peering.
Beginning with the configurations of the Hub Network, similar to scenario 1, we can establish virtual network links for our Private DNS Zones to the hub virtual networks, ensuring that all DNS connectivity is routed through the Hub Network.
However, to enable the spokes to resolve these entries from within the Private DNS Zones, we need to deploy a Private DNS Resolver. I won’t delve into the specifics of the Private DNS resolver here, but in essence, we create an inbound endpoint on the Private DNS Resolver.
Inbound endpoints furnish an IP address for forwarding DNS queries from on-premises and other locations outside your virtual network.
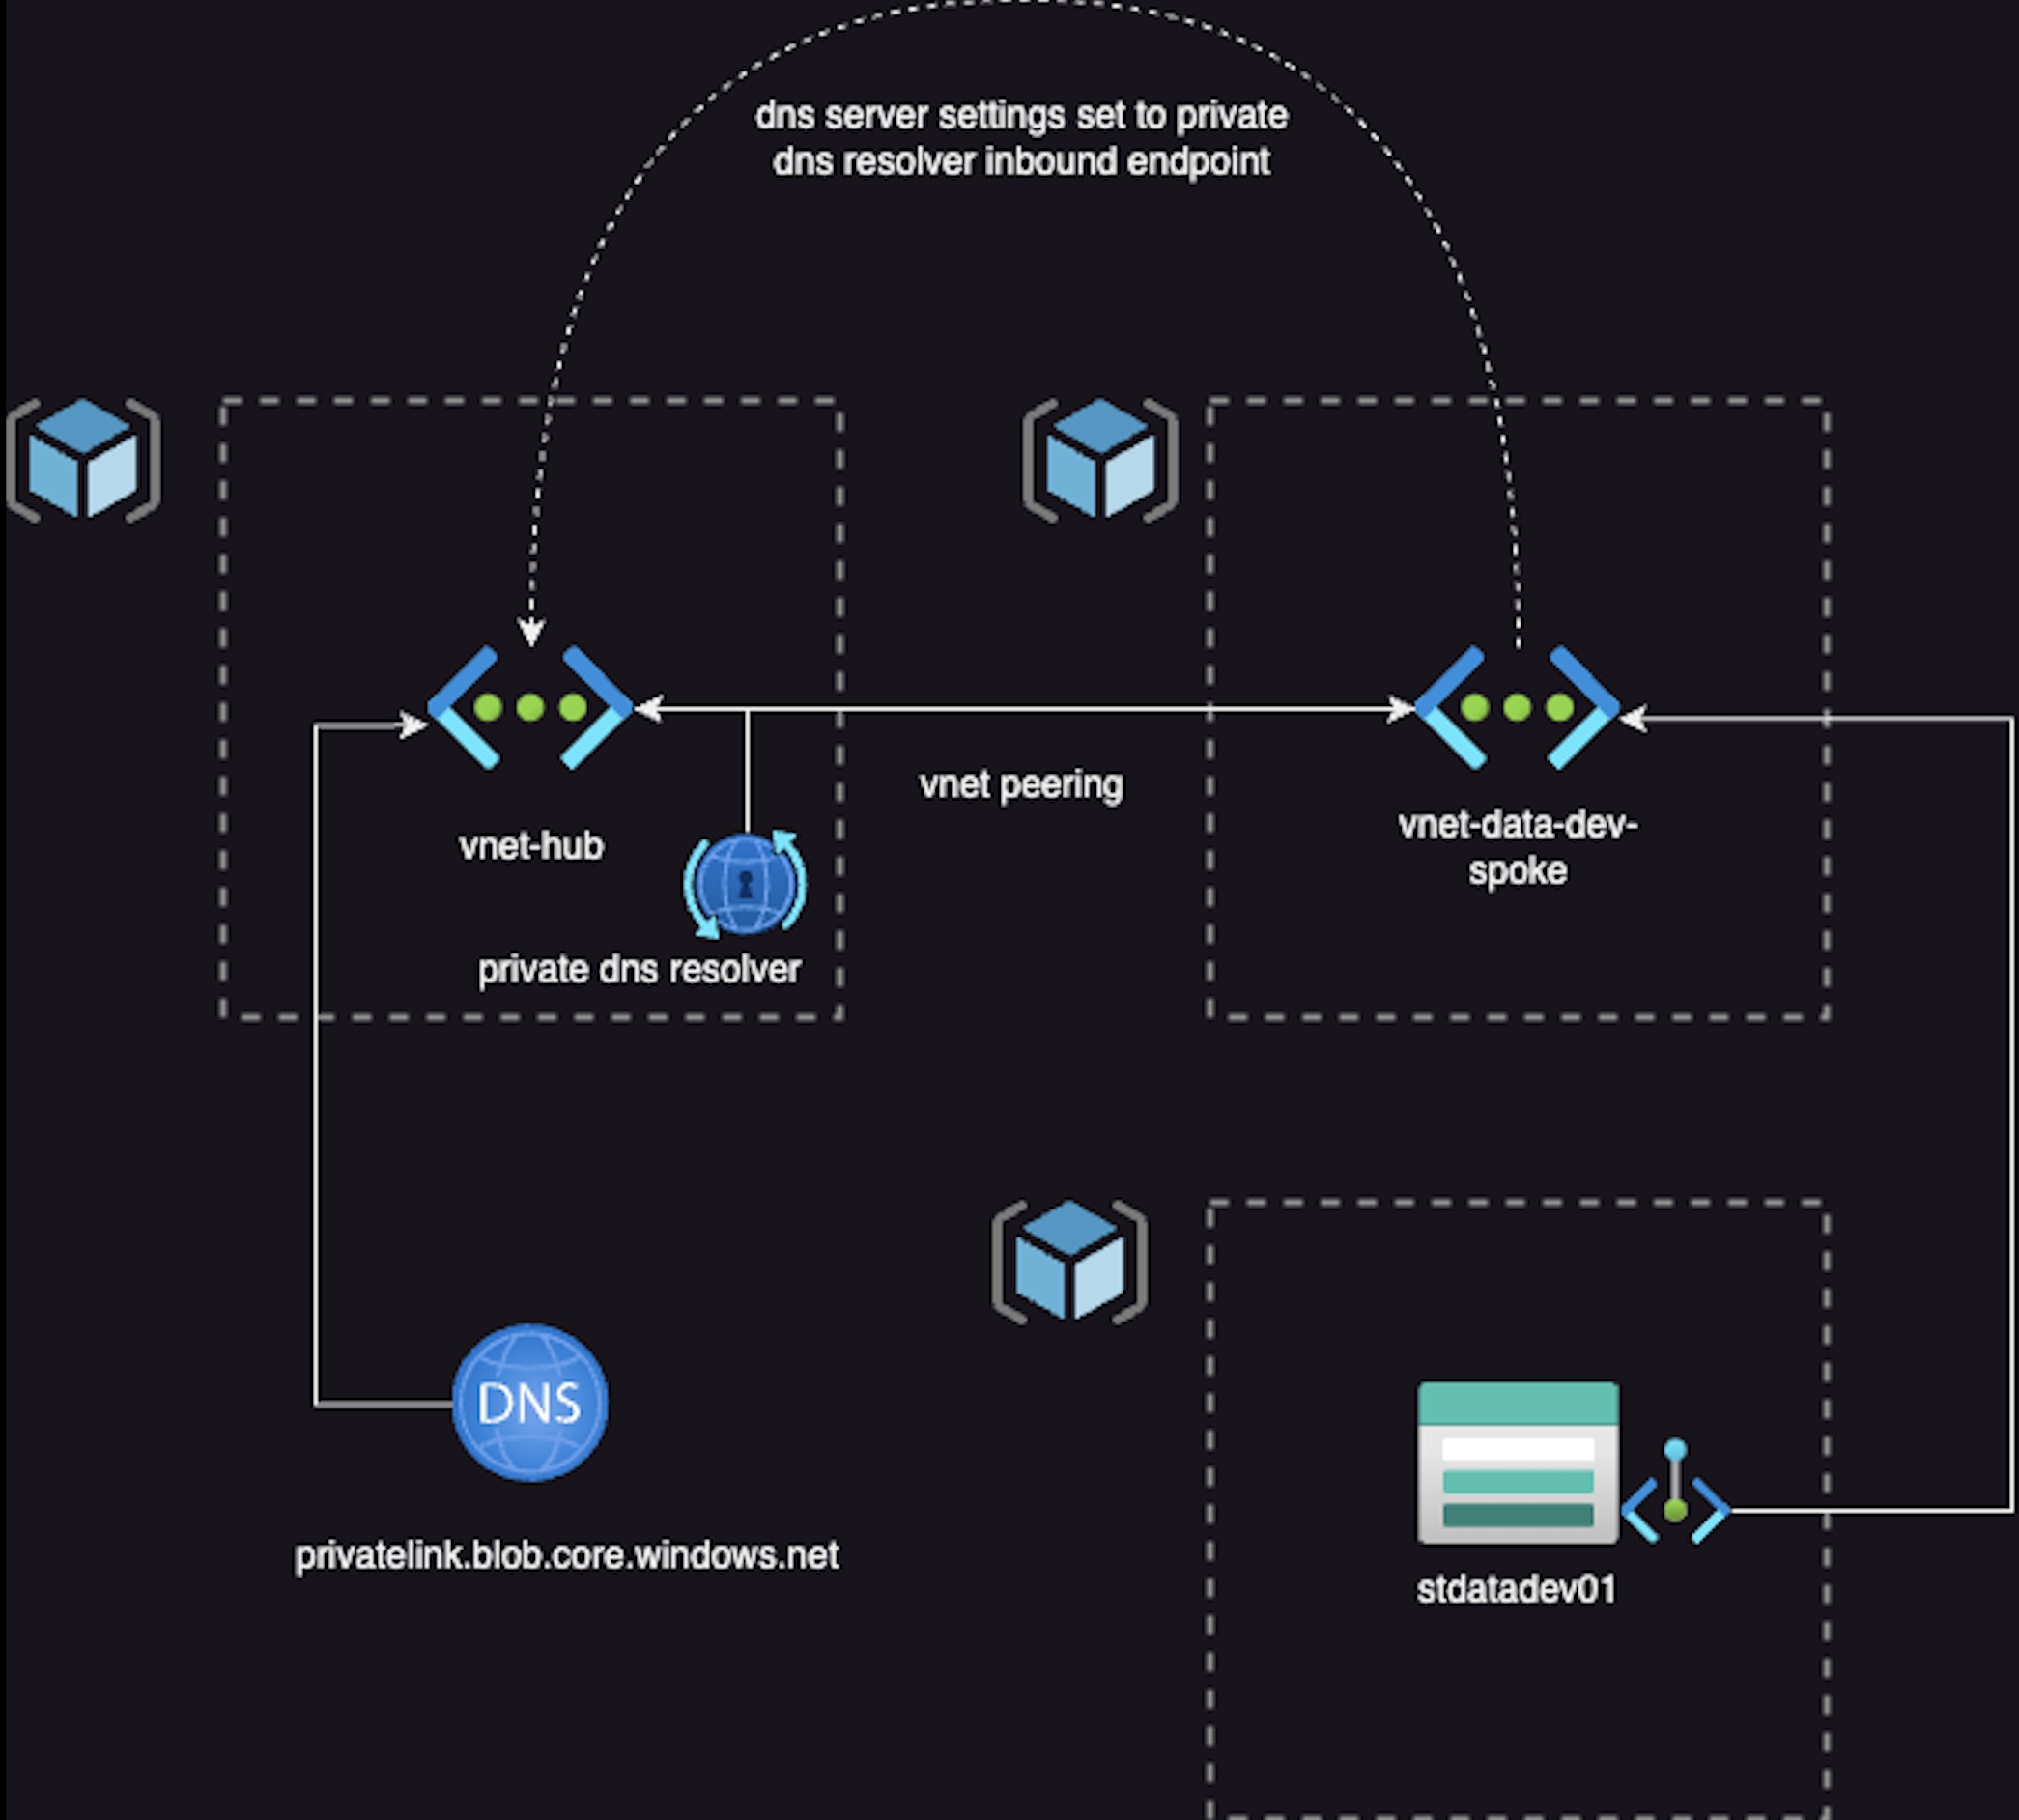
Consequently, on our spoke virtual network, we can configure the DNS server settings to point to the IP address associated with the Inbound Endpoint on the Private DNS resolver.
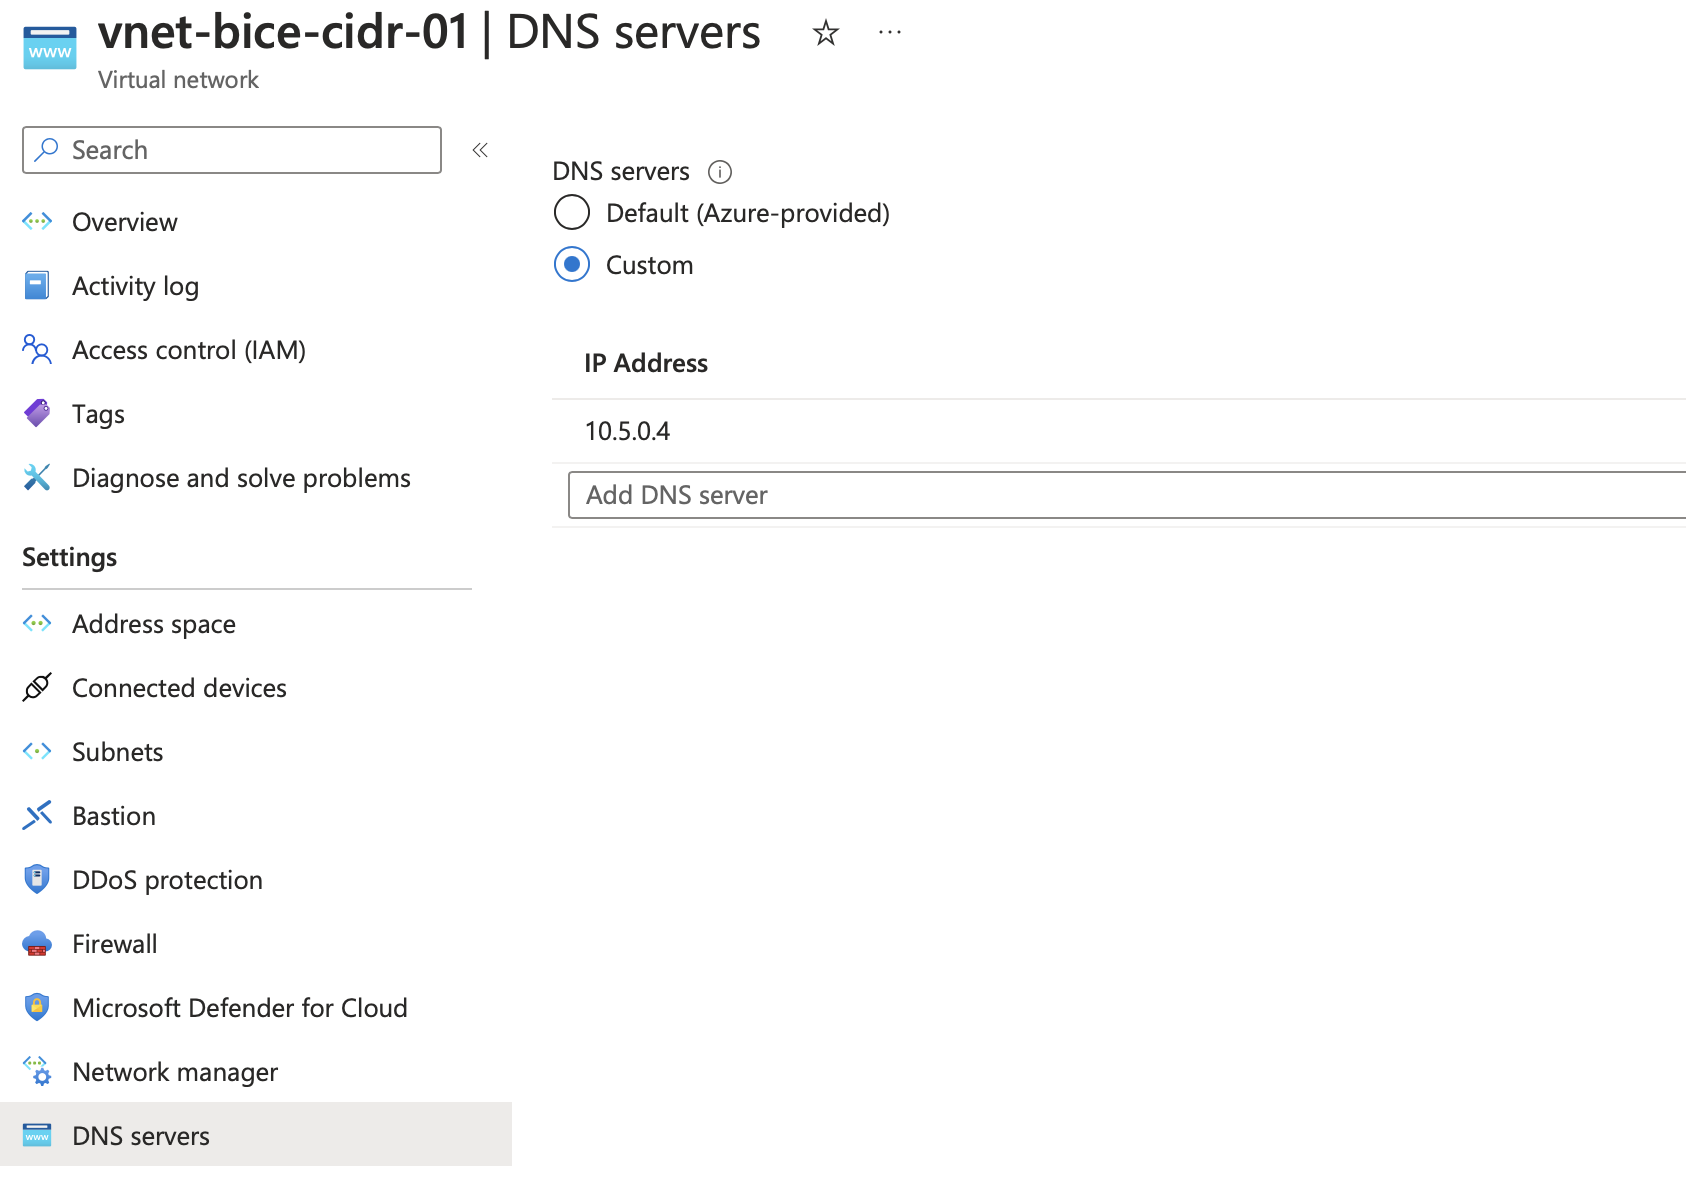
Once configured as described above, name resolution will be successful in the spoke. As you add more spokes to your Azure environment, ensure they are deployed with the same DNS settings to enable resolution of the Private Endpoints.
Voila! With this setup, you can now resolve through a hub and spoke topology.
DNS Option 3 Enterprise Scale
Scenario 3 is tailored for enterprise-scale deployments and, like option 2, follows a hub-and-spoke topology. However, in this design, we introduce DNS servers hosted on Virtual Machines, which is a common setup for organizations that have adopted an enterprise-scale architecture.
Now, I know the diagram might seem a bit overwhelming, but let’s break it down step by step.
First, let’s focus on the Hub network. This will be deployed similarly to scenario 2, where we’ll set up our Private DNS Resolver and the Private DNS Zones with their Virtual Network links to the Hub Network.
As mentioned earlier, in an enterprise-scale setup, it’s likely that we’ll be using DNS servers hosted on virtual machines. These servers typically reside in the Identity subscription within its own VNET, and we’ll establish VNET Peering between the Identity VNET and the Hub VNET.
On the DNS servers, we’ll need to configure conditional forwarders to direct all DNS requests to the Private DNS resolver’s inbound endpoint. These forwarders must be configured for all the different private DNS zones we have.
However, it’s crucial that the forwarders are set to use the public visible name, not the private name. In other words, the forwarder must be set to “blob.core.windows.net” instead of “privatelink.blob.core.windows.net”.
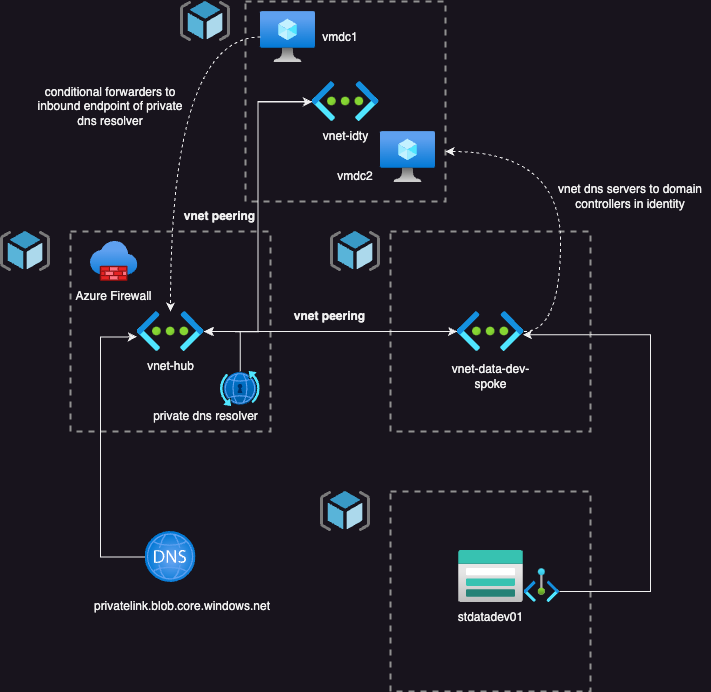
Once you’ve set up those conditional forwarders, just point the spoke networks to the DNS servers of the domain controllers, similar to scenario 2.
But instead of using the inbound endpoint as the Private DNS Resolver, we’ll use the private IP address of the domain controller VM.
So here’s the flow:
- Spoke network asks for Private Endpoint resolution.
- The request is sent to the DNS server VMs configured on the Spoke Virtual Network.
- These Virtual machines forward the requests, based on the conditional forwarders, to the Private DNS resolver.
- Name resolution is successfully established.
Another option is to link the Private DNS Zones to the identity VNET if you’re not using the Private DNS resolver. With this setup, configure conditional forwards to the Microsoft Fabric DNS server at 168.63.129.16.
This method enables name resolution for an enterprise-scale environment without needing links to be set to the hub network; only the identity VNET needs to be configured.
Wrap Up
To wrap it up, getting your DNS setup right for Private Endpoints is crucial. It’s a key part of the plan when you’re setting up those Private Endpoints, and getting it spot on ensures smooth and secure operations from the get-go.
Once you’ve configured your DNS Zone, if you’re looking to automate the association of Private Endpoints to their respective Private DNS Zone, check out my blog where I walk you through using Azure Policy for this: link
I don’t recommend option 1 for enterprise environments; it’s better suited for testing purposes or if you’re currently stuck with everything in one Virtual Network.
I hope you found this blog helpful! Feel free to reach out to me on LinkedIn if you have any questions.