
Intro
In this blog post I will show you how you can generate custom images for your Virtual Machines, or Virtual Machine Scale Sets using Azure Image Builder configured all through BICEP as Infrastructure as Code with Azure Verified Modules (AVM).
All code presented in this blog can be found in my GIT HUB DataOpsDon/DataOps (github.com)
I hope you enjoy this blog and find the contents of this topic useful!
The Challenge..
If you are ever deploying code to your Azure Service behind Private Endpoints, you will appreciate that you require a Self-Hosted Agent (or Runner) to carry out your automated deployments through CI/CD pipelines.
For example if you are deploying a DACPAC to an Azure SQL Database that is situated behind a Private Endpoint, the default Microsoft generated agents do not have network access to deploy to the that database, therefore you need a Self-Hosted agent within your VNET or another VNET that is peered with the right routing rules to be able to contact that service that is behind a Private Endpoint.
A Self-Hosted agent can be in the form of a Virtual Machine, Virtual Machine Scale-Set, or a Container App Instance, for the purpose of this blog we will focus on a Virtual Machine Scale-Sets and Virtual Machine.
Ok, so you need a Self-Hosted agent, what’s the big deal? Well the problem the now is yes you have network connectivity to your services behind Private Endpoints but the agents do not have anywhere near the required tooling that comes with the Microsoft Hosted agents, such as the Azure CLI, PowerShell Core or the DAC framework, this is just to name a few…
This is where Azure Image builder comes in, with Azure Image builder we can define a custom image all as code to install the necessary components we require for our Self-Hosted agents. Better still this can all be done as Infrastructure as Code (with a little help of PowerShell to install the tooling we require).
Below I’m going to go through the steps and configurations required to get started with Azure Image Builder.
The below configurations are just a starting point and you will want to ehance this to better fulfil your requirements for your Self-Hosted Agents.
Ok enough waffle, let’s get into it!
Resources Overview…
When it comes to setting up Azure Image Builder, we are going to be deploying a few more resources than just just the Azure Image Builder Resource, we are in fact we are going to be deploying the the following..
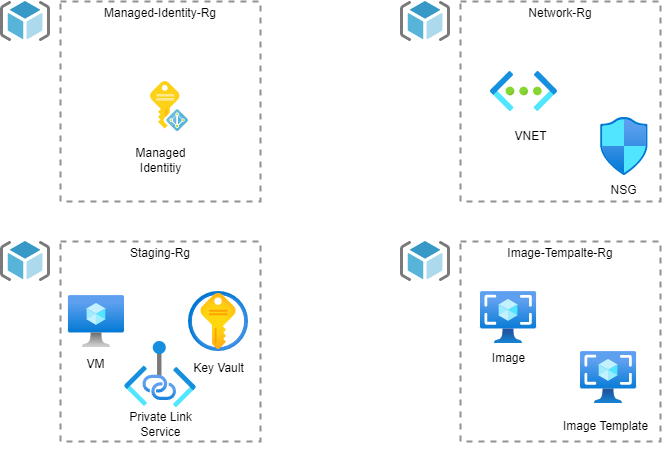
So as you can see we are going to be deploying 4 Resource Groups, and their purposes are as follows
Managed-Identity-Resource-Group – This Resource Group will be use to host the Managed Identity that will be utilised for creating the staging resources and the template image that Azure Image builder Service will deploy (it’s running Packer Under the hood)
Network-Resource-Group – This Resource Group will be use to host the Virtual Network that the Staging VM (used to create the image) will be deployed into, hosting the VM in a dedicated VNET means that the traffic will utilise the Private Link Service and ensure the traffic is secured and run privately.
Staging-Resource-Group– This Resource Group will be use to host the staging resources which are temporally created as part of the creation of the image, these resources include a Virtual Machine, Key Vault and Private Link Service. These resources will be created and destroyed automatically as part of the Image Build Process, so you don’t have to worry about configuring or managing these resources.
Image-Template-Resource-Group– This Resource Group will be used to host the Image template image resource which is the output of all this configuration which our Self-Hosted agents can be generated off.
The Fun Stuff… (IAC)
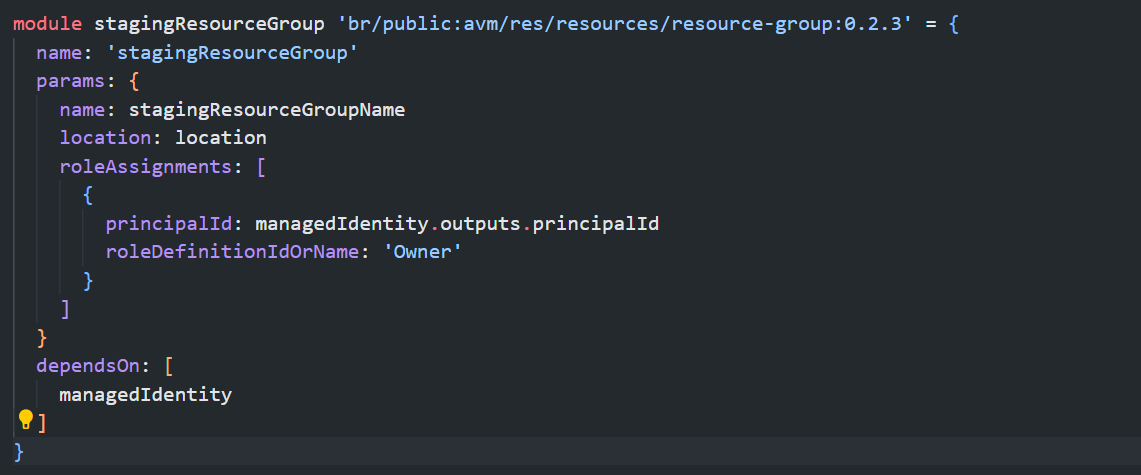
So when it came to developing the Infrastructure as Code for this, I decided to use Azure Verified Modules (AVM) as this took away a lot of the laborious development of standard modules I regularly define, and also means that I can port this with ease to multiple repositories and environments. In my GH repo I am using AVM for the image builder template, but for the purpose of the blog I am referencing a template I quickly knocked up so I can you show you the exact resource properties that are required.
As you can see there is nothing too fancy going on here, just some simple modules for creating resource groups with role assignments for the Managed Identity that we are are creating as well as the VNET and the Subnet for our Virtual Machine that will be created as part of the build process to be deployed into. However there is a few gotchas that you need to be aware of…
First up the Managed Identity (which is key to all of this) will need to be an Owner of the Staging Resource Group Contributor access is fine on the other resource groups, and in addition when configuring the subnets it is key that privateLinkServiceNetworkPolicies is set to Disabled. If these settings are not set, then the provisioning of the Image Template will simply fail.
Also notice the cheeky cidrSubnet function defined to make it simple to deploy the required /27 subnet, simply pass in the VNET address prefix and the rest will be handled for you.

OK that’s the easy bit out the way, when it comes to defining the Image template, there are a few more things to think about. Below I have shown what my module resource for the image template definition looks like and I’ll describe the key properties you need to get right in order for this to work
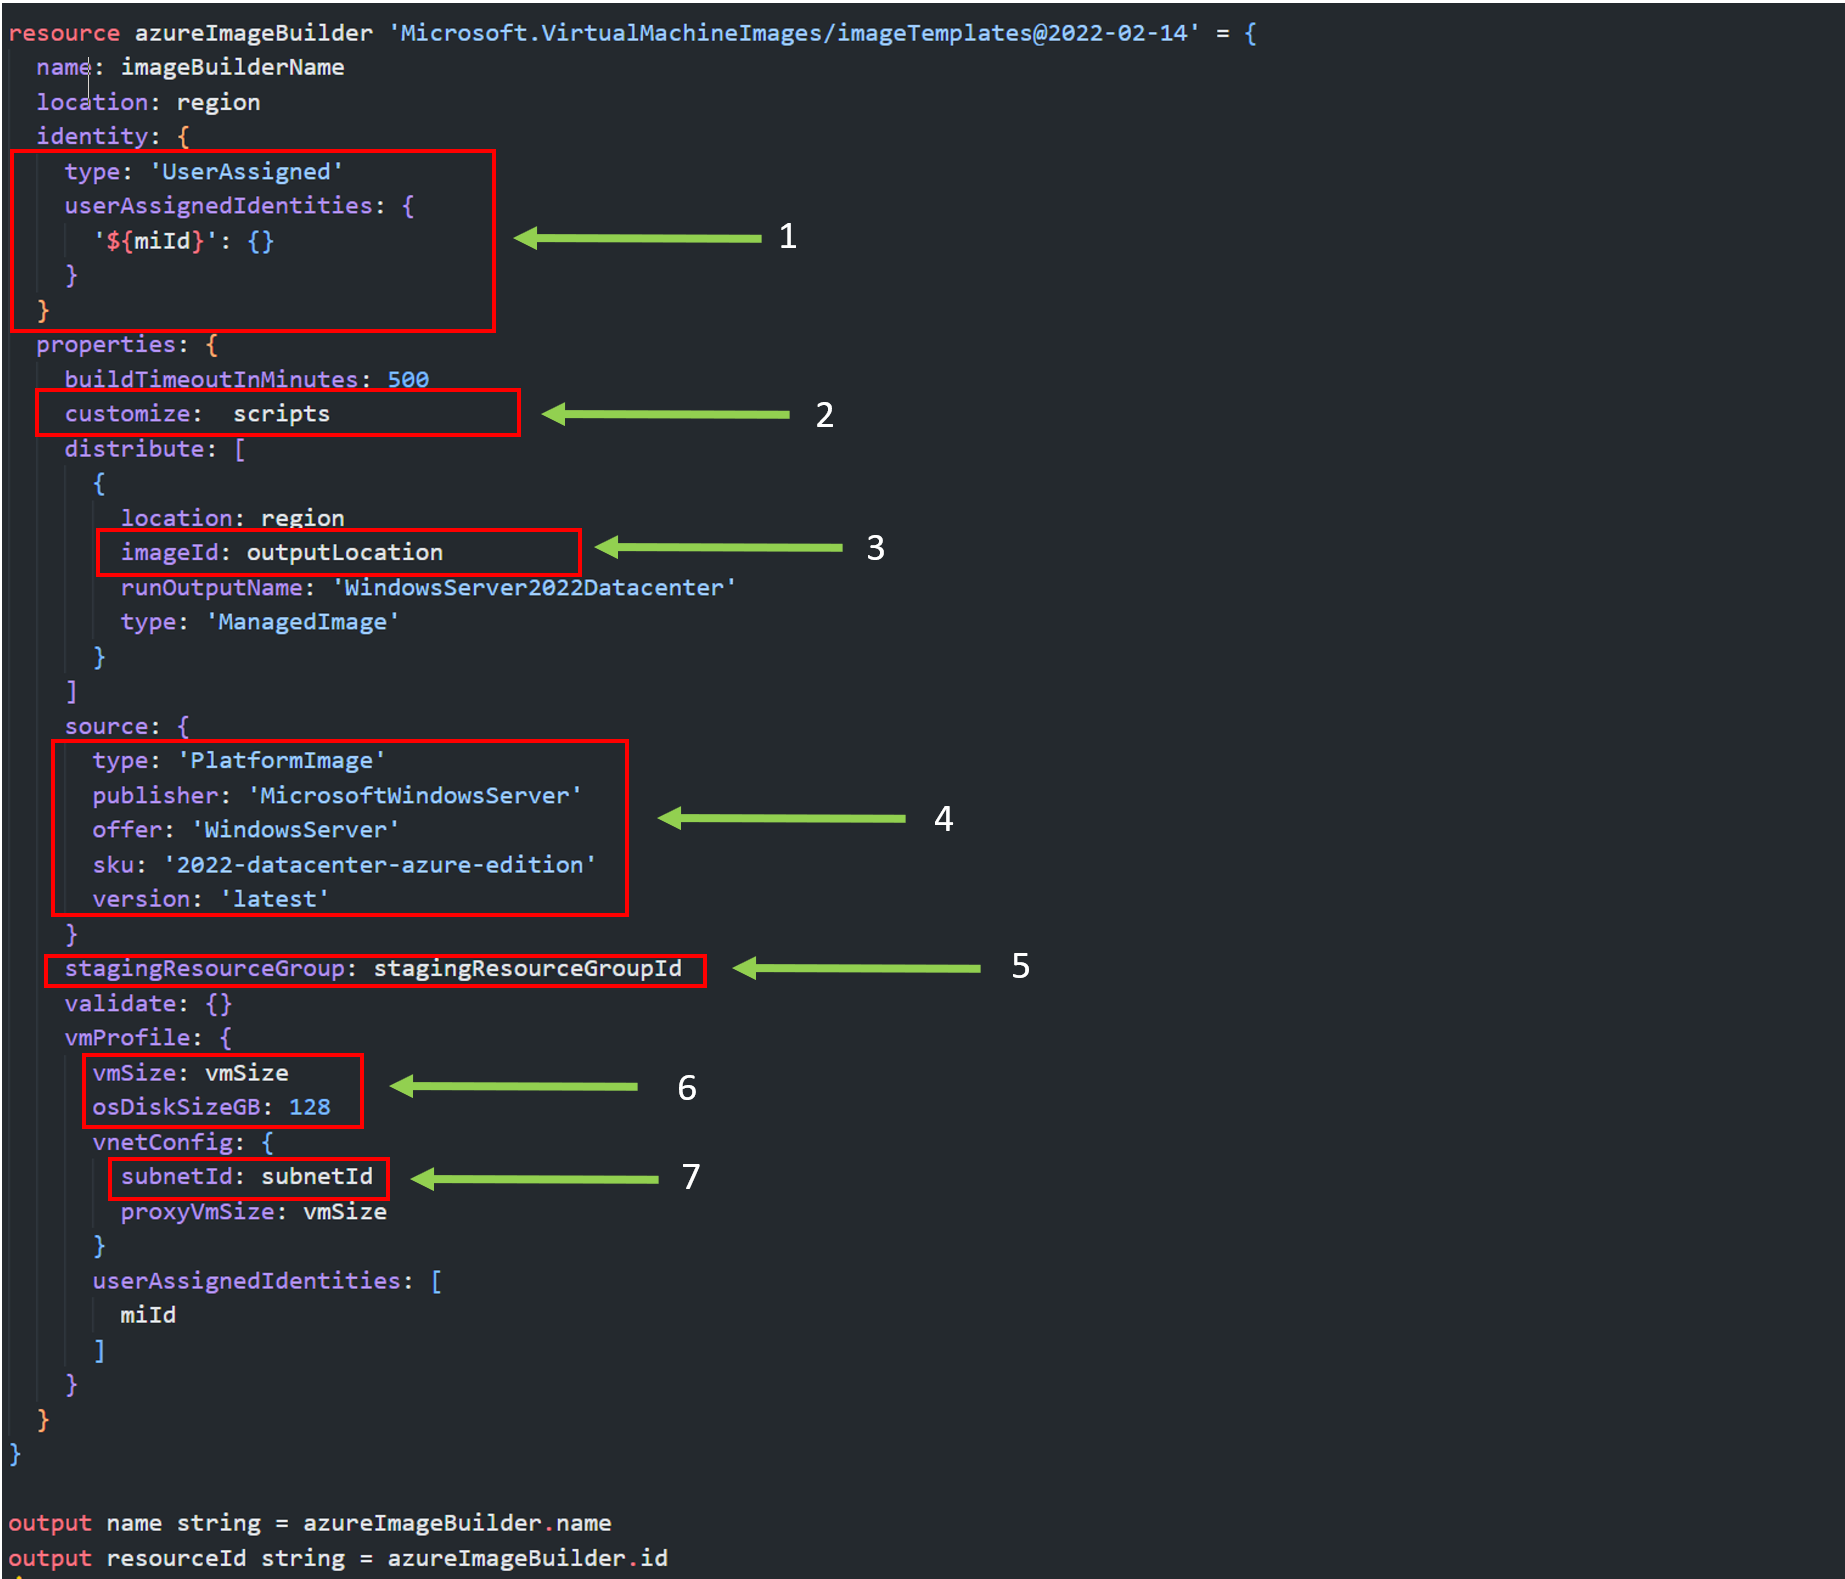
- This is the resource Id of the user assigned managed identity that was previously described further up, what we are doing here is simply associating the MI with the template Image resource so it has it has the access to create the required resources.
- This is an array of scripts and configurations that are used to define the image, I have simply parametrised this and will be called in the composite layer of the IAC, (I’ll go through this further down. the page.
- This is the location of where the output image file is to be situated, this can be in a different resource group or subscription, however you need to make sure the Managed Identity has access to this location that you specify.
- This is the source configuration of the image, in this case I’m using Windows Server 2022, however you may want to use a different flavour of windows available on the market place i.e. Windows 11
- The Staging Resource Group is the resource Id of the resource group that will be used to host the temporary resources that Packer generates to create the image, i.e. the Key Vault, VMs and Private Link Service. If the resource group name specified doesn’t exist then it will be created. This parameter value will need to be explicitly referenced, you cannot use the resource Id function as the resource does not exist yet!
- The VM size property is simply what the size of the staging VM that is used to create the image is, the beefier the VM the more it costs, but you may find your images are created more effectively (I personally use a Standard_D8s_v3)
- Subnet Id is what is says on the tin, this is the resource Id of the subnet used to deploy the staging VM into.
Customising your Image
Now that we have defined the various properties about the image template, it’s time now to start defining the tooling that we want on our Images.
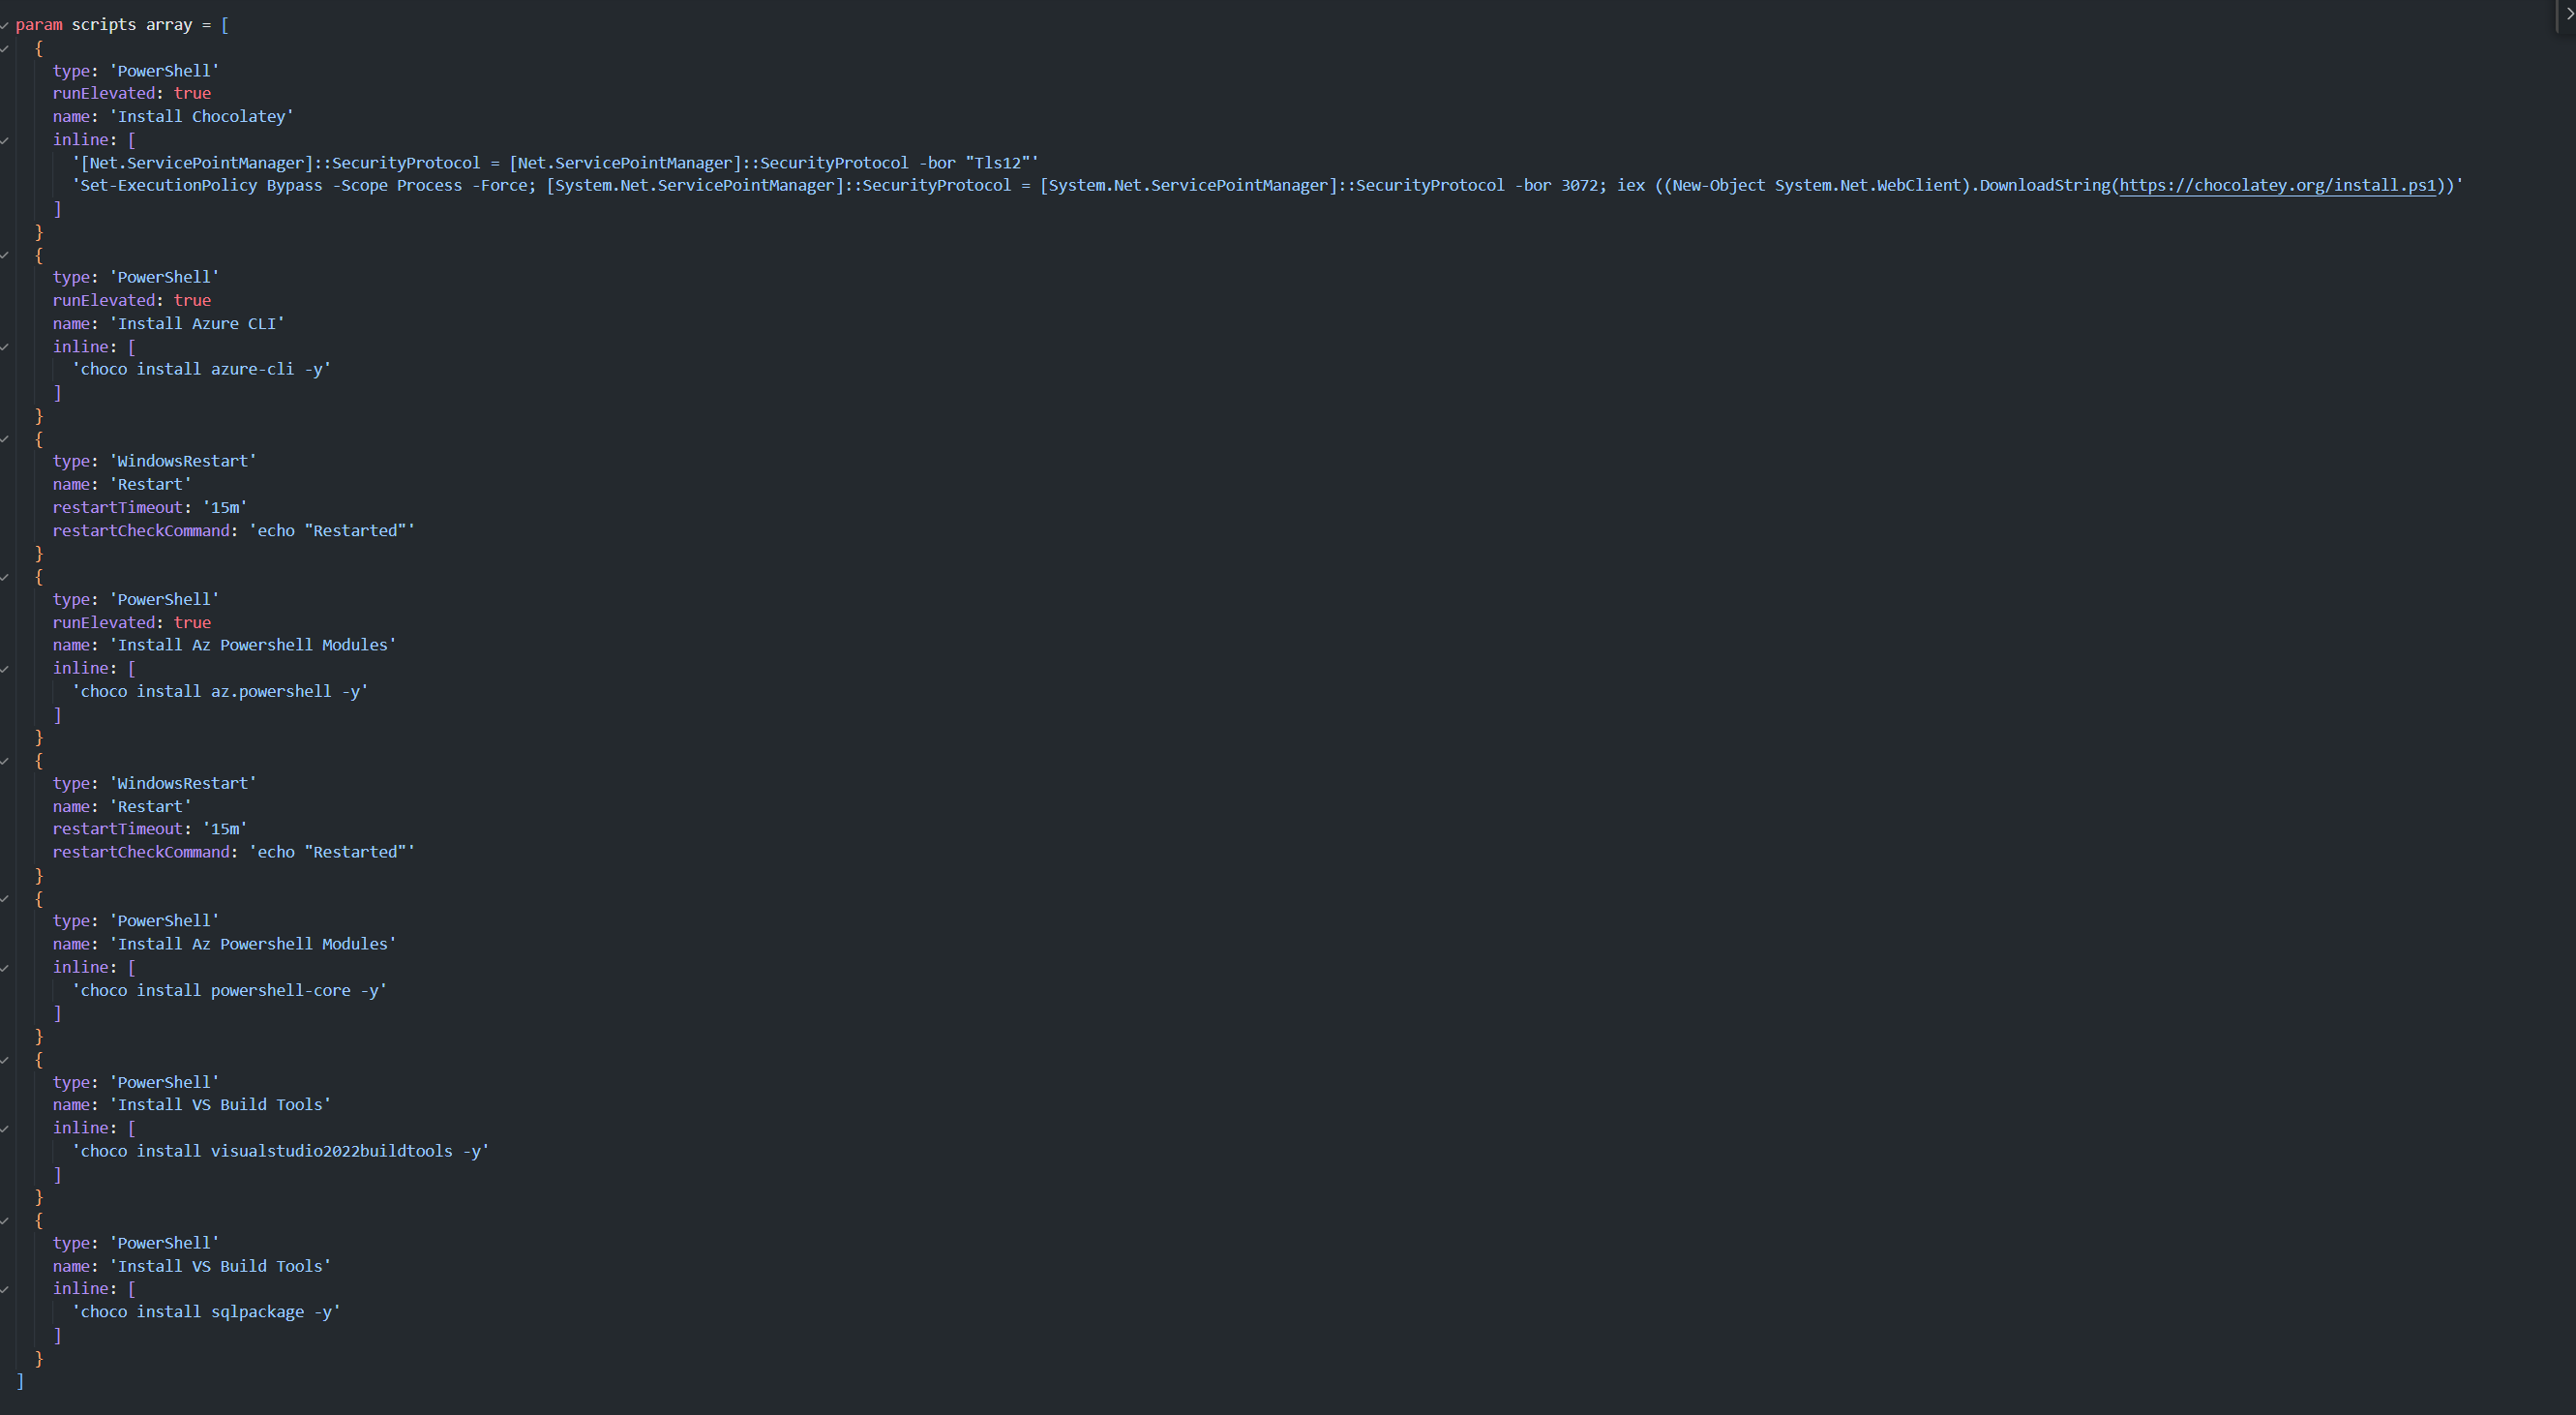
As I mentioned in the previous section, I created a parameter for my customiser scripts, to make the template as re-usable as possible and for the purpose of the blog I want to keep things simple.
From my personal experience I have found it very useful to use a package manager such as Chocolatey to managed the install of the applications that I require, so as you can see the first thing I do is install Chocolatey onto the image which then gives me the ability to run Choco commands to install the relevant tooling that I require, i.e. I am adding the Azure CLI, Azure PowerShell modules, PowerShell Core as well as various others.
It must be noted that these scripts can be hosted in files and uploaded into a Blob Storage for the Image Builder template to reference, which does make code cleaner however again for the purpose of this blog I wanted to keep things simple.
Ok, now that we have our configuration we can deploy our BICEP template if you are not familiar on IAC or how to deploy this file I’ll cover this off in another Blog.
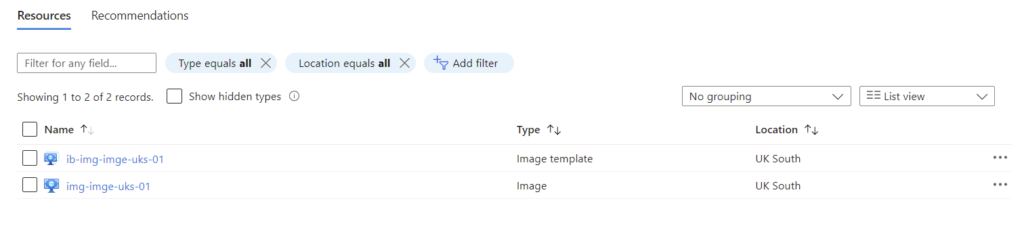
Once the deployment is complete you should see an image template resource in your image resource group (like below)

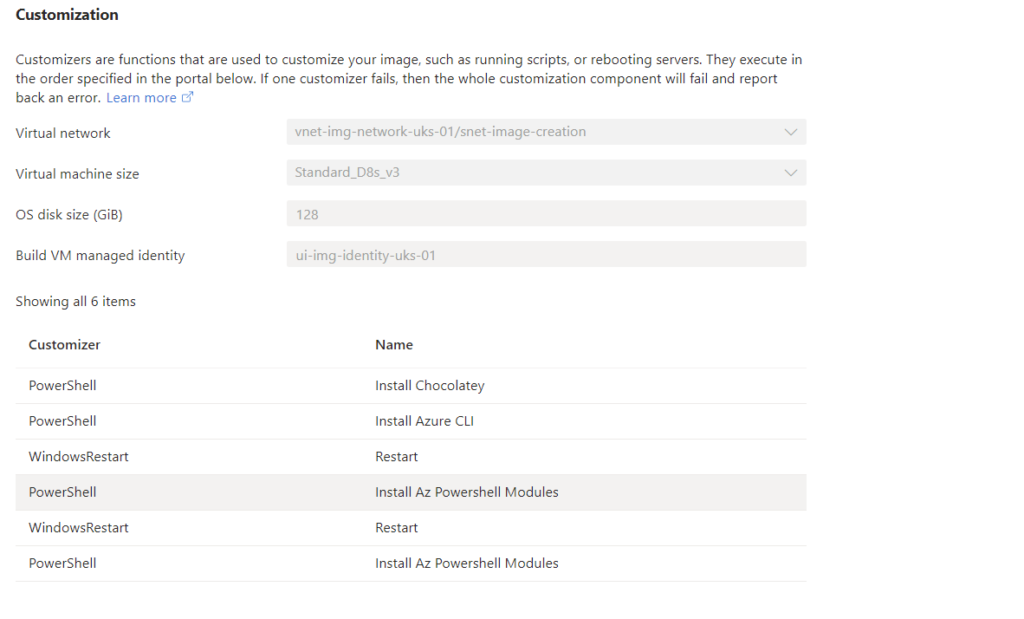
Now if you click on your template image resource and select configuration you will see all the customiser scripts commands that was defined in the IAC template as well as the Managed Identity associated with the Image template resource, VM Size and the subnet for VNET (see below)
Kicking off the build
Once you are happy with your configuration, you can now start the build by simply clicking Start Build (see below)
At the point where you start the build, the Packer process will be initiated which will now go and create the in the staging resource group to build the image of the configurations defined in the customiser. Now this process can take a little while depending on mainly how many customisers you have defined, to put it in perspective, the configuration that I have defined in my IAC takes around 30 minutes to build.

Once this build has completed, the image resource will be outputted in the location that you defined in your IAC (see below)
Now that Image resource is generated, this can be used to as source for when creating your Virtual Machine or Virtual Machine Scale-Sets thus building the instance with the relevant tooling that has been defined as part of your Image Builder template.
Wrap Up
So to wrap up, I have shown you how you can simply create a custom image resource with all the tooling that you require to enable the running of your Self-Hosted agents using Infrastructure as Code.
Now you may question that this can all be done natively within Packer, and yes you can create the images natively in Packer, however the beauty of using Azure Image builder to create your Image template means you can create your images natively in Azure using Managed Identities and having all the configuration is IAC, rather than (JSON), or a lengthy HCL script file.
As I mentioned all the IAC templating can be found in my GH DataOpsDon/DataOps (github.com)
I hope you found this Blog useful and best of luck using Azure Image builder to create your Self-Hosted agents